Showing posts with label DIY. Show all posts

Thursday, May 10, 2012

High & Wide Baby.

Today I wanted to talk about a tip that has helped me quite a bit as I decorate our new home. If you're anything like I was/am, you are challenged in the drapery department. My mother in law worked for JcPenney Custom Decorating for something like 20 years, and I am sure she was appauled at my choice in curtains in our last house. I really had no idea what to do with windows. I suppose I didn't do THAT bad, I went with all white sheers and white romans. No biggie. Except for one big thing. I hung them low and narrow. GASP. As in, basically just covering my windows. Yikes.

So then, as I navigated the decor world over the years, I noticed a big trend that I was NOT a part of. Hanging your window treatments HIGH up on your wall and WIDE on your windows. Why was it not obvious to me before?? What a ginormous impact this single tip has on a room.

Want to make your windows seem twice as large? Make your ceilings feel higher? Room feel more grand? Make a statement instead of just being "there"? Well then my friend, here is your solution. Easy as easy can be too.

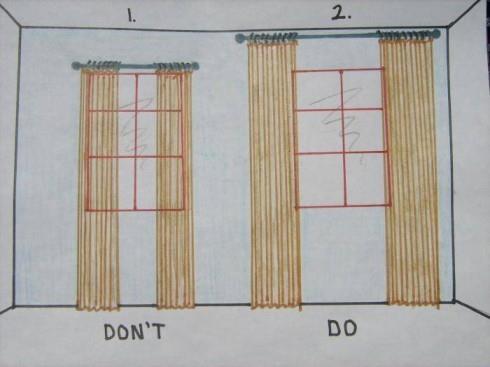
Here is an illustration, just so you can get the idea. When I saw this earlier last week, I just knew I was going to have to share it. Because as much as I know the difference, it was crazy to see it drawn out so simply.

This is from Elements of Style.

Now wontcha look at that! BAM. Can you believe that is even the same window???  Drastic improvement.

Along those lines, here are some of my tricks when dressing a window.

-Curtains should be either puddled on the ground a bit, or just touching the ground.

-Hang them within about 3-6 inches from the ceiling.

-That means, no more 84" inch panels. 95" all the way.

-Hang your rod wide enough so that the entire panel hangs just on the outside of the window frame. What I do, is have the panel approximately one inch over the window trim. So JUST covering the molding.

-You can either leave them as is, or if you want more privacy, hang roman shades. I hang  mine directly behind the curtain rod. Waaaaay up high on the wall. By doing this, you'll increase the height of the window and it will appear as though the window continues all the way up.

-With the romans, when they are open, open them so that they are JUST covering the top window molding.

-White panels ALWAYS work in a room. Always. If you have a dark space especially. I almost always go with white. I like to use white panels and patterned or bamboo romans (see HERE for my no-sew roman shade tutorial that has something over 18k Pinterest pins). White just brightens the space and again, makes the window seem much larger. Plus they are just so versatile and timeless. I like grommet top (if you plan on opening and closing them a lot especially) or back tab, which give you a nice pleated look. I steer away from tab top.

-If you want to add color or pattern and don't want to use a roman, you can use white panels and then cut one patterned panel down the middle and add them to the outside of the white panels. Giving you just a splash of color.

-For sliding glass doors, I do the same thing. Our deck slider has the rod hung right under the ceiling, with bamboo shades hung directly behind the rod. I used white grommet top panels so that they can be flung open and closed easily. The door looks WAAAAAAY bigger than when we moved in and vertical blinds were in place. YIKES. Stay away from verticals if you can at all help it. Talk about the '90s!

-For rods, I like large brushed nickel. As in, not the skinny skinny rods. I also like round finials. Classic, traditional, timeless. Honestly though, go with what suits your taste. Oil rubbed bronze and black are also nice.

Here are some examples of the window treatments hung in our house so far. We have only done the family room, master bedroom, kitchen, and partially the play room. I say partially because my plan is to make patterned fabric roller shades or romans. I just haven't gotten on that yet. I am working it around in my head, in terms of what color/pattern I want in there.

Playroom

This is the closest shot I have to a before. Before this though, the previous owner had frilly lace curtains hung directly over and on the window.

I would hang the curtains even wider than this if you can. I didn't because I was trying to use the rod I already had, which was stretched out as far as it would go. If I ever feel like it, I'll buy another rod and pull the panels out 6 more inches or so. Notice how I left the space between the rod and the window bare here. Works just fine. Shades to come eventually.


Master Bedroom

Again, closest I have to a before. This was the previous owners. Waaaaay too low. Too shiny. Mini blinds. Brass tiny rod.

Here is the other window.

After. BAM!!!! Can you even believe this is the same window???
Now I realize this is not the same window as the first photo. But, I haven't finished the other window and this one was dressed the exact same way as the other one was, before I took it all down for the photo above.
Notice the high bar, romans hung directly behind it and opened up right to the edge of the window. White panels hung completely on the outside of the window. This looks like a completely different window. Craziness.

Family Room

Before.
Previous Owners. So much wrong with this.

After
This was before we painted and moved the bookcase out of the room.

The room how it is now, from another angle. I don't know why I don't have a straight on shot. Whatev.

Here are some of my suggestions for inexpensive, versatile, white panels.

TARGET Grommet Top 95" FOR $35 (I have these in my family room and kitchen)

IKEA Back Tab 98.5" (comes with hem tape) for $10 a PAIR (these are the ones I have in my bedroom and playroom)

I think I've illustrated my point here. High and wide baby. Any other window treatment questions??

Thursday, April 26, 2012

Industrial Modern FUN

After a night full of working (mostly Steve) until 2am, we wrapped up the shelving unit! It looks 1000x better than I even imagined and I couldn't be any more thrilled with it. My incredible husband amazes me with his skills! He always works so hard to see my ideas and designs come to fruition. What a guy!

(Now, pardon the photos. I am a day or so away from being able to use my computer and Lightroom again, but for now I had to shoot in jpeg and do zero editing. So these are all straight out of the 'ol camera.)

Without further ado, here is our industrial/mid-century modern work of art. VOILA!

Don't mind the TV cords. Soon to be moved behind the TV.

Are you loving the gray wall as much as I am?? Again, we chose Sherwin Williams Grayish and it is perfect. Bright and light, with a touch of warmth, and it contrasts nicely with the white trim. It is a smidge off in color here, sorry, again, no editing. It is showing a bit greenish in the top two photos, but it is more warm and ZERO green in real life.

In terms of the styling, I am really enjoying how it is coming together. I am trying to blend loads of texture and keep everything earthy in color. Notice glass, metal, leather, lambskin, soft blankets, mirrors, paper, greenery, wicker, wire.

A bunch of the pieces I have found recently while antique shopping, some of them we've made or repurposed, and a couple of items we already had. I still have a fantastic Kodak camera from the '50s on the way from Ebay, as well as a really cool metal airplane. Other than that, this is it.

LOVE these '50s books I picked up last weekend for a buck or two a piece (Actually, the blue one is more recent, but looks super modern to me). Talk about great titles too!! "Fortune Is A Woman". Truer words were never spoken. ;) I painted that little wooden airplane that I snagged for $1.

Steve welded this nifty piece of artwork for me. Totally cool.

I am diggin' the mixture of soft/cushy with the wicker and metal and wood. Again, sticking with earth tones.
I picked up those wicker boxes at Michael's (last night actually) for 40% off plus 20% off with an entire purchase coupon. DEAL! They are perfect for holding all of our DVDs and our DVD player.

This awesome antique toy phone Steve and I discovered while on our day trip last month. The box is one I had that I painted with chalkboard paint.

These are all books I had. Camera for $5 last weekend. Spheres I made and featured HERE.

This cigar box I scored last weekend as well. Marked for $20 at the antique shop, I offered $10, she agreed. Woohoo! Perfect spot for the remotes and incredibly cool. 

All in all, a BIG success! It was surely a labor of love though. It took more time, more money, more stress, less sleep and a smidge of disagreeing (only natural right?) to get it done, but in the end, it is even better than I thought. 100% custom, totally unique, and crafted by hand by my amazing Stevie-Poo (sorry babe). 

Maybe I'll get more into the construction of it later (including more photos once we paint more than just that one wall), but for now, that's all folks! What's your favorite element/piece??

Oh, and a before and after, just for fun.

BEFORE

AFTER

Wednesday, April 25, 2012

Family Room Sneak Peek!

GAH!!! I'm so excited! Steve and I finally mustered up the energy to start back up on the family room shelving unit. We have been a smidge burned out lately and needed a minute to catch our breath. AHHHHH. So. Now that THAT is out of the way, onward!

Last night we set up the entire thing. Measured it, anchored it to the wall, put the unstained boards on it, hung the tv, and made sure we were happy. Ummmm. Happy? ECSTATIC! I didn't want to take it down!

Alas. We had to. Steve has to remove the two middle units in order to remove the boards to stain them. So it was just a sneak peek. But he managed to stain all the shelves last night and they are ready to go tonight. See? (iphone pics again, my computer is still on the fritz so I have no Lightroom)

Oh they look heavenly. Nice and dark cocoa-ish to pick up on the woodtones on the other side of the room in my desk and post office box. Coordinates so nicely with our coffee bean couches and contrasts perfectly with the white end tables and frames and the blue rug. I wanted them to look a bit distressed and aged, and Steve did such a great job. Love love love!

Here is what the piping looked like up, without the wood of course.

HUGE right??! I was surprised at how substantial they are! I mean, I knew it was going to be most of the wall, but it is hard to envision until you actually see them up. It is going to make SUCH a statement in the room and the entire first floor (this wall is visible throughout the floor). I don't even think you can tell that well from the photo, but they are lovely.

We are also planning on painting that wall tonight. Steve picked up the paint that I finally chose last night, and hopefully we'll whip that out this evening. We don't want to have to take the entire unit down again just to paint, so we'll do this one wall and then finish the rest soon.

Here is the color I picked.
Sherwin Williams Grayish. We color matched (like always) to Olympic Premium Latex paint since it is one of the only zero-voc paints with zero-voc colorant as well. Can't wait to see it up!! It is nice and light and bright and slightly warm to coordinate with all the warm brown tones we have in the room. Yet not beige-ish or too cool. I think it is going to be perfect with the industrial shelving. Hopefully tomorrow I can come back and show you! Maybe, maybe not. We'll see how much we get accomplished this evening.

Another really cool update for the room is in the artwork realm. I managed to snag four (fantastic!) nautical maps of Lake George NY on ebay this week. Graphic yellow. Gray. White. BIG. Annnnnnd $15 for all four. KILLER! I am going to frame them in the same frames that I used for the gallery wall and they will be grouped as a set on the wall where the old oak bookcase was. Here is a sneak peek.

PERFECT right??! I am in love. I had no idea they were going to be this lovely. What an absolute steal. Just when you think Ebay is lost and way overpriced. Wait until you see how incredible they are going to look all together.

I also have been wrangling some funky objects for the shelving lately. Today I painted a box I have been saving, with chalkboard paint. CB2 inspired! You'll see that soon. Lots going on here, and soon I'll have some more reveal photos to share. It is just so fun to see things coming together!

Monday, April 23, 2012

Outdoor Shenanagins

Now that the weather here has begun improving (ok, aside from the SNOWSTORM today!), we scribbled down our outdoor to do list. It is long. It is extensive. BUT, it is doable. I think. I hope! Here is a shot of what we have to do for this year.


The decking gets delivered tomorrow and we'll be getting the permit this week so that we can break ground on that next weekend. That is super exciting for me!! We didn't have a deck at our first house either, so it is going to be new and fun for us. May is a busy month for us, so hopefully we can finish it before June.

I did manage to accomplish a small task last week. Mulch! Steve picked it up during lunch one day and dropped it off for me. I spent nap time with the monitor on my hip and got to work! I managed to finish most of the front "garden" and it made a big improvement. It is always amazing the difference mulch can make. Gives everything a fresh, clean, polished look. Very affordable too. Lowes has mulch on sale for $10 for four bags. Cheap cheap. We used 10 bags for the front.

Here are some before shots. I only managed to use my iPhone that day. Notice the rock edging we did last month. We dug out all the red scalloped brick edging they had previously.


And the afters (again, sorry about the iphone pics. Nap time hurries!)

Look at our purdy flower blossoms! (I don't know if this is a cherry or crab apple or what. Do you??)
We stuck with the dark brown mulch and I like how it looks like nice freshly tilled sod. Or dirt. I don't really know the difference. (Can you tell I am not a landscaping expert??)

These are some of the bushes we will be ripping out. Yuck! All the greenery you see are Black-Eyed Susans.
Ahhhh improvement already! All it took was $25 in mulch and an hour during naptime. Plus I scored a free arm workout (dragging those bags around) annnnnd a teeny sun tan. SCORE.

Thursday, April 12, 2012

Quick & Dirty Cushion Recover

Last night I had a burst of energy and inspiration to do a little project while the kids were with Steve outside. I grabbed a piece of scrap fabric and my staple gun and got to work! I have two ottomans/benchs in our family room for people to prop their feet on. Our room is very wide, so you can't reach the "coffee table" to put your legs on, so I like to have these available. Who likes to relax on the couch without a foot rest?? I recovered one already with a bright yellow chevron fabric, but this one was just plain white and I really wanted to update it a bit. I had a minute so off I went!

Here it is before. We actually recovered this about seven years ago. It was Steve's grandparent's old stool and it used to be floral.

All you need is a piece of fabric (I am using leftovers from the roman shades in the kitchen, which was actually a tablecloth from Target), a staple gun, and staples.


Step 1) Remove the cushion from the stool. Mine was not attached this time because there is a little storage area underneath, but the last one I did was screwed in.

Step 2) Lay your fabric out and place the cushion on top. (Don't mind the old gross vents. When we redo the kitchen they will be getting replaced.)

Step 3) Cut. I know. This is all very complicated. Thank GOODNESS you have the photos. ;)

Find a baby to park it on the corner of the cushion. PHEW! Glad I have one just hangin' around.

Kidding. I couldn't get him to move his tush.

Step 4) Start stapling it nice and tight. Make sure your pattern is right where you want it by flipping it over and checking the placement first. I do the two long edges first, then corners, then short edges. I'm not an expert on corners, I just fiddle with them until I like the way they look and do lots of stapling.

Step 5) Replace the cushion on the bench, screwing it on if you need to. VOILA!

Now. I am planning (I think) on painting the wood either white or gray. But I want to wait until we paint the family room because I'll just do it at the same time. Also, I always have a hard time taking the plunge when it comes to painting hardwood furniture. I am always afraid of ruining it! So, I mull it over awhile just to be sure. For now, both ottomans are wood toned and when I decide, I'll do them both. Or not. We'll see.

Here it is in it's home. Ready to be pulled out as needed or have a drink or magazine plopped on it. Whatev.

Oh shoot, I should have taken a better photo. See at the top of the mail sorter? I put the West Elm spheres that I made up there. Perfect spot! The stain matches 100% and it adds a bit of height to the piece which, in my opinion, was just a teeny bit short before. Someday I'll take a real photo to show you better.

So there you have it folks. That took me 5 minutes. Quick and dirty (notice I didn't show you the underside once it was stapled? That is where the dirty comes in. Who cares! No one can see it). Now it looks like it was purposely chosen for the room. YAY!

Wednesday, April 4, 2012

Industrial-Modern Progress.

After much hemming and hawing (is that the correct phrase?), we finally decided to go for the industrial-style wall shelving unit for the family room. I was ALLLL over the place about it!

Initially, we had decided on doing a full wall built in. Then I started thinking, it would be SO permanent and what if I changed my mind (which is not uncommon for me). So then we thought about using this great mid-century modern credenza that we have, for the TV, and flanking it with two free standing white bookcases. Ehhh, boring.

I had seen a fabulous metal piping shelving unit on HGTVs "High Low Project" and I kept going back to that concept. But then I would get all freaked out about it and move on. So then I started thinking we could do white floating shelves on either side of the credenza. Similar to this.


I still think that is a good idea, BUT, I just wasn't sold.

This space is visible from the large majority of the first floor. Our family room is open to the kitchen, which is open to a dining space, which is open to the playroom. So anything we do on this wall will make a big impact on the rest of the floor. I think we have gone pretty classic/traditional in the furnishings of the family room. I also think that with the white gallery wall, and white end tables, and eventually white kitchen, it just might be TOO much white.

Soooo here we are back at industrial. It will add a modern flair to the space and a bit of contrast with the white. It is pretty unique and I think it will be just the touch we need for the room.

Here is the wall we are referring to.


It is about 15 feet long, and the unit will be about 12 feet. So it will take up a good portion of the wall. The bookcase on the left will be leaving the room, by the way. Here is the sketch of what it will look like. The only thing that is different, is the 3rd shelf from the top, will be moved to be in the center of the space where the tv goes. That will eliminate the two big spaces on either of the side units.

Here is an inspiration photo. Like I said before, the first time I saw it was on the "High Low Project", but this one is another one I liked. Obviously, it is not piping, nor is it attached to the wall, but it is part of where we got our inspiration.

Ours will have dark stained, distressed wood planks as well. They will pick up the dark tones in our desk and post office box on the other side of the room.

Here is a shot of all the materials to make one of the four pieces (We'll get more into the building process later).

A close up of the really fabulous texture of the pipes.

Finally, here is Steve holding up one of the four parts to it.
The wood planks will rest directly on top of each of the metal pipe rails.

So that's where we are now! I am getting really excited to see how it turns out. When we went to the antique mall last month I picked up a bunch of unique, funky pieces to put up, so I can't wait to put it all together. We also have to paint the room still, so that will be coming up soon. We are in a rush to get things done inside before the weather gets nice and we start the work on our new deck. (Speaking of that, I'll be back at some point soon to show two of our decking options so you can help us decide which to go with.)

Oh, before I go, here is a little something Steve made for me. I have been eyeing the big metal letters from Anthropologie, and at $100 a pop, I knew I wouldn't be taking the plunge anytime soon. Steve bought a welder recently, and this was his first project.

That man sure knows what tickles my fancy! Haaaa. You can't see it in the photo real well, but I started adding silver nailhead trim to the bench, and I love how it picks up on that. Just love it. See what I mean when I say our house is evolving? I am constantly changing up that entry way!