
So then, as I navigated the decor world over the years, I noticed a big trend that I was NOT a part of. Hanging your window treatments HIGH up on your wall and WIDE on your windows. Why was it not obvious to me before?? What a ginormous impact this single tip has on a room.
Want to make your windows seem twice as large? Make your ceilings feel higher? Room feel more grand? Make a statement instead of just being "there"? Well then my friend, here is your solution. Easy as easy can be too.
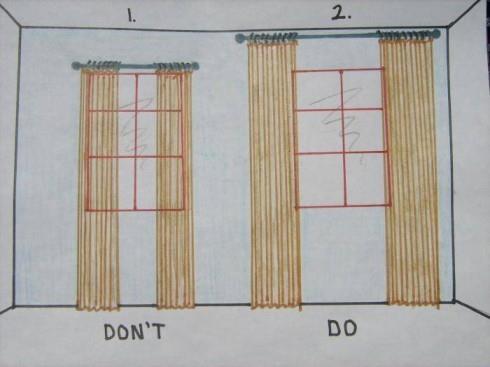
Here is an illustration, just so you can get the idea. When I saw this earlier last week, I just knew I was going to have to share it. Because as much as I know the difference, it was crazy to see it drawn out so simply.
This is from Elements of Style.
Along those lines, here are some of my tricks when dressing a window.
-Curtains should be either puddled on the ground a bit, or just touching the ground.
-Hang them within about 3-6 inches from the ceiling.
-That means, no more 84" inch panels. 95" all the way.
-Hang your rod wide enough so that the entire panel hangs just on the outside of the window frame. What I do, is have the panel approximately one inch over the window trim. So JUST covering the molding.
-You can either leave them as is, or if you want more privacy, hang roman shades. I hang mine directly behind the curtain rod. Waaaaay up high on the wall. By doing this, you'll increase the height of the window and it will appear as though the window continues all the way up.
-With the romans, when they are open, open them so that they are JUST covering the top window molding.
-White panels ALWAYS work in a room. Always. If you have a dark space especially. I almost always go with white. I like to use white panels and patterned or bamboo romans (see HERE for my no-sew roman shade tutorial that has something over 18k Pinterest pins). White just brightens the space and again, makes the window seem much larger. Plus they are just so versatile and timeless. I like grommet top (if you plan on opening and closing them a lot especially) or back tab, which give you a nice pleated look. I steer away from tab top.
-If you want to add color or pattern and don't want to use a roman, you can use white panels and then cut one patterned panel down the middle and add them to the outside of the white panels. Giving you just a splash of color.
-For sliding glass doors, I do the same thing. Our deck slider has the rod hung right under the ceiling, with bamboo shades hung directly behind the rod. I used white grommet top panels so that they can be flung open and closed easily. The door looks WAAAAAAY bigger than when we moved in and vertical blinds were in place. YIKES. Stay away from verticals if you can at all help it. Talk about the '90s!
-For rods, I like large brushed nickel. As in, not the skinny skinny rods. I also like round finials. Classic, traditional, timeless. Honestly though, go with what suits your taste. Oil rubbed bronze and black are also nice.
Here are some examples of the window treatments hung in our house so far. We have only done the family room, master bedroom, kitchen, and partially the play room. I say partially because my plan is to make patterned fabric roller shades or romans. I just haven't gotten on that yet. I am working it around in my head, in terms of what color/pattern I want in there.
Playroom
This is the closest shot I have to a before. Before this though, the previous owner had frilly lace curtains hung directly over and on the window.

I would hang the curtains even wider than this if you can. I didn't because I was trying to use the rod I already had, which was stretched out as far as it would go. If I ever feel like it, I'll buy another rod and pull the panels out 6 more inches or so. Notice how I left the space between the rod and the window bare here. Works just fine. Shades to come eventually.

Master Bedroom
Again, closest I have to a before. This was the previous owners. Waaaaay too low. Too shiny. Mini blinds. Brass tiny rod.

Here is the other window.

After. BAM!!!! Can you even believe this is the same window???
Now I realize this is not the same window as the first photo. But, I haven't finished the other window and this one was dressed the exact same way as the other one was, before I took it all down for the photo above.
Notice the high bar, romans hung directly behind it and opened up right to the edge of the window. White panels hung completely on the outside of the window. This looks like a completely different window. Craziness.

Before.
Previous Owners. So much wrong with this.

After
This was before we painted and moved the bookcase out of the room.

The room how it is now, from another angle. I don't know why I don't have a straight on shot. Whatev.

TARGET Grommet Top 95" FOR $35 (I have these in my family room and kitchen)
IKEA Back Tab 98.5" (comes with hem tape) for $10 a PAIR (these are the ones I have in my bedroom and playroom)
I think I've illustrated my point here. High and wide baby. Any other window treatment questions??

Love your blog and seeing how you've transformed your home! I found you on Pinterest through your famous DIY roman shades. I haven't taken the leap yet to try it, but I'm getting inspired by your simple & fun style. It's refreshing to find a home design blog with realistic projects for busy moms on a budget!
ReplyDeleteThank you so much Susan! Thanks for reading!
Deletexo
h
wow, I love that last photo of your living room! so many great things going on. do you mind if I ask about those shelves?
ReplyDeleteThank you! We are just finishing up the family room and haven't even featured everything yet. The shelving though, we did talk a bit about a couple of posts back. I'm on vaca without a computer right now, but if you click the link on the side of "shelving ", you should find it. :) we made then out of pipes from home depot!
DeleteJust came over from Pinterest and looked around a little bit. Love your writing style and fresh fun house! And can i say i really like that you proved you can have wood tones infused throughout your home and it still look new! Yay! I've been working on a room in my house and had about given up on finding any inspiration that used wood tones and not just ikea laquered furniture. :) I'm your newest follower.
ReplyDeleteThank you thank you thank you!! That was all so sweet and encouraging! And yes, i really like blending traditional, classic, pieces with modern to get a more warm, inviting space. Wood really helps accomplish that! Thanks for the feedback. Xoxox h
Deletewhere did you get those shelves in your last picture??
ReplyDeleteHello! We are just finishing up the family room and haven't featured everything yet. The shelving though, we did talk a bit about a couple of posts back. :) we made them out of pipes from home depot!
DeleteI did it!!! I switched the living room curtains to High and Wide!!
ReplyDeleteI was a little skeptical that it would work (1) my window is only 4 inches below the ceiling, so it is only about 1/2-1 inch below the ceiling now (2) my curtains do not drape lovelylike all the way to the floor, but I think it works b/c they are somewhat tucked behind the couch. (3) I could only go about 3 inches from the side of the windows too, and (4) AFTER I drilled new holes, I found out that I could only go about 3 inches to the side (OH, and my rod is still brass, although I may spray paint it...).
But, with all those caveats, I have to say....I LOVE IT!!!! It really really does open up the room!! I was amazed to see the difference in your bedroom pics too!
Anyway, I was wondering if you coudl message me on facebook or our email with your number (if you have texting that is!) and I will text a pic to you...or I could text it to suz and have her forward it to you if you would prefer (and I would NOT be offended;oP).
Now, the only thing I need to do though is either replace my couch or find an inexpensive way to slipcover it, because the pattern/color does NOT work.. baby steps though.
AWESOME AMY! So glad you like the results! Sounds like your space is really coming along. I would LOVE to see!
Deletexoxo
h
Hi!!!
ReplyDeleteHow is the solution if i have differents levels of the ceiling over the windows?
Thank you very much for your attention and your fantastic advices!!!
Frances from Lake of Como, Italy
Heather... We just moved into our house last week and are still waiting on carpet (next week)... but in the mean time I am getting everything together for the windows. So thank you for this informative post because I am new to the window treatment world! Your windows looks wonderful and I am definitely going to be copying. I already bought everything to make my DIY roman shades, just waiting for some free time. One question: How did you attach the roman shades to the wall behind the curtain rod? I was thinking about drilling holes in the back of the top of the blinds so they could be hung? What is the easiest way that you have found? Thanks for your blog, I love it. Please post more :)
ReplyDeleteWhy, you're welcome! Congrats on the new house! Exciting! Carpeting will make SUCH a huge HUGE difference. When ours was installed, I swear it was like a new house.
DeleteSo, I installed them with the brackets that came with the blinds actually. I just screwed the bracket into the wall, and slid them in. There are two things you can do to cover the brackets. You can either NOT glue down the end pieces of fabric at the top, and then glue them after you hang, directly on top of the brackets. Or you can make a small strip, like a valance, and glue that to the top part. Covering the brackets that way.
Thanks for visiting, and good luck!!
xo
H
What is that color in your bedroom? It's gorgeous!
ReplyDeleteI bought 95"panels of some heavier material curtains (not sheers) and I can't hang them high enough w/o a big pile on the floor and the puddle does not work w/ these heavier curtains. I dont really care the puddle look personally (unless they're very thin sheer fabric). I'm realistically not going to hem 6 panels. Not sure what to do. I ordered the 85" as well as my back-up. We have a huge high room so I don;t need the illusion. I can just do wide I guess.
Ugh decisions!!