Showing posts with label master bedroom. Show all posts

Thursday, May 10, 2012

High & Wide Baby.

Today I wanted to talk about a tip that has helped me quite a bit as I decorate our new home. If you're anything like I was/am, you are challenged in the drapery department. My mother in law worked for JcPenney Custom Decorating for something like 20 years, and I am sure she was appauled at my choice in curtains in our last house. I really had no idea what to do with windows. I suppose I didn't do THAT bad, I went with all white sheers and white romans. No biggie. Except for one big thing. I hung them low and narrow. GASP. As in, basically just covering my windows. Yikes.

So then, as I navigated the decor world over the years, I noticed a big trend that I was NOT a part of. Hanging your window treatments HIGH up on your wall and WIDE on your windows. Why was it not obvious to me before?? What a ginormous impact this single tip has on a room.

Want to make your windows seem twice as large? Make your ceilings feel higher? Room feel more grand? Make a statement instead of just being "there"? Well then my friend, here is your solution. Easy as easy can be too.

Here is an illustration, just so you can get the idea. When I saw this earlier last week, I just knew I was going to have to share it. Because as much as I know the difference, it was crazy to see it drawn out so simply.

This is from Elements of Style.
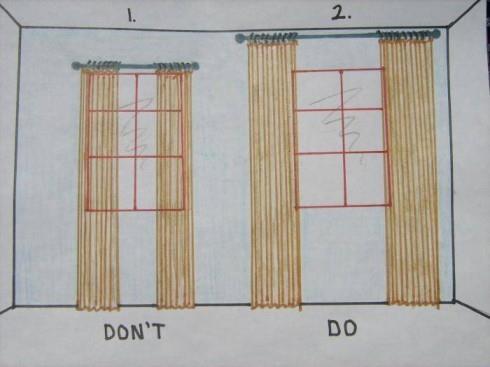
Now wontcha look at that! BAM. Can you believe that is even the same window???  Drastic improvement.

Along those lines, here are some of my tricks when dressing a window.

-Curtains should be either puddled on the ground a bit, or just touching the ground.

-Hang them within about 3-6 inches from the ceiling.

-That means, no more 84" inch panels. 95" all the way.

-Hang your rod wide enough so that the entire panel hangs just on the outside of the window frame. What I do, is have the panel approximately one inch over the window trim. So JUST covering the molding.

-You can either leave them as is, or if you want more privacy, hang roman shades. I hang  mine directly behind the curtain rod. Waaaaay up high on the wall. By doing this, you'll increase the height of the window and it will appear as though the window continues all the way up.

-With the romans, when they are open, open them so that they are JUST covering the top window molding.

-White panels ALWAYS work in a room. Always. If you have a dark space especially. I almost always go with white. I like to use white panels and patterned or bamboo romans (see HERE for my no-sew roman shade tutorial that has something over 18k Pinterest pins). White just brightens the space and again, makes the window seem much larger. Plus they are just so versatile and timeless. I like grommet top (if you plan on opening and closing them a lot especially) or back tab, which give you a nice pleated look. I steer away from tab top.

-If you want to add color or pattern and don't want to use a roman, you can use white panels and then cut one patterned panel down the middle and add them to the outside of the white panels. Giving you just a splash of color.

-For sliding glass doors, I do the same thing. Our deck slider has the rod hung right under the ceiling, with bamboo shades hung directly behind the rod. I used white grommet top panels so that they can be flung open and closed easily. The door looks WAAAAAAY bigger than when we moved in and vertical blinds were in place. YIKES. Stay away from verticals if you can at all help it. Talk about the '90s!

-For rods, I like large brushed nickel. As in, not the skinny skinny rods. I also like round finials. Classic, traditional, timeless. Honestly though, go with what suits your taste. Oil rubbed bronze and black are also nice.

Here are some examples of the window treatments hung in our house so far. We have only done the family room, master bedroom, kitchen, and partially the play room. I say partially because my plan is to make patterned fabric roller shades or romans. I just haven't gotten on that yet. I am working it around in my head, in terms of what color/pattern I want in there.

Playroom

This is the closest shot I have to a before. Before this though, the previous owner had frilly lace curtains hung directly over and on the window.

I would hang the curtains even wider than this if you can. I didn't because I was trying to use the rod I already had, which was stretched out as far as it would go. If I ever feel like it, I'll buy another rod and pull the panels out 6 more inches or so. Notice how I left the space between the rod and the window bare here. Works just fine. Shades to come eventually.


Master Bedroom

Again, closest I have to a before. This was the previous owners. Waaaaay too low. Too shiny. Mini blinds. Brass tiny rod.

Here is the other window.

After. BAM!!!! Can you even believe this is the same window???
Now I realize this is not the same window as the first photo. But, I haven't finished the other window and this one was dressed the exact same way as the other one was, before I took it all down for the photo above.
Notice the high bar, romans hung directly behind it and opened up right to the edge of the window. White panels hung completely on the outside of the window. This looks like a completely different window. Craziness.

Family Room

Before.
Previous Owners. So much wrong with this.

After
This was before we painted and moved the bookcase out of the room.

The room how it is now, from another angle. I don't know why I don't have a straight on shot. Whatev.

Here are some of my suggestions for inexpensive, versatile, white panels.

TARGET Grommet Top 95" FOR $35 (I have these in my family room and kitchen)

IKEA Back Tab 98.5" (comes with hem tape) for $10 a PAIR (these are the ones I have in my bedroom and playroom)

I think I've illustrated my point here. High and wide baby. Any other window treatment questions??

Friday, April 6, 2012

A Random Smattering of Goods.

After yesterday's post, both writing it all out like that, and hearing people's opinions/thoughts, we decided to go ahead with the mahogany. It will contrast nicely with the green when we replace the siding next year, and I think the dark, rich color will be perfect. As much as it will be hot, I remembered that the back of the house is facing north and doesn't get much sun until the evening. So that's good. I know it will show dry dirt and dust a lot, but I think overall, it's an alright trade off. One decision DONE.

Last week I also picked up some new lamps for our master bedroom. The lamps we were using were about a foot too short for our VERY tall bed and just were a pain in the neck to use. I was waiting for a sale at Target (where else), and finally I lucked out with a buy one, get one half off promo! Score. So I snatched up two of these babies (and lampshades of course).

I was trying to find lamps that were feminine & sparkly, yet not TOO in your face girly. I think they add the perfect touch of luxury and girl to the room.
 
Not to mention, they are tall enough for us to actually be able to read at night. Imagine that!

So pretty. I just love 'em. At under $35 a piece for the base and shade, they were a good price and make a big impact in the room.

Here is what the old lamps looked like.

annnnnnd the new! I love the height.

In other news (I'm all over the joint today), one of the next projects up is the dining room. Currently it is our staging room for things that haven't found a home since we've moved in/we won't be using anymore, as well as other random junk. Here is what it looks like right now.

Oh man, why am I showing this?? My brothers plants, random wall art that hasn't found a home, furniture we're not using, an old hideous chandelier, miscellaneous items for the new bookcase. Just craziness.

Yup. Craft supplies. Stuff to return to Target. Stuff to take to Goodwill. Baby carrier.

 I have a long to do list for this room, but mostly it is all quick and easy things that I can do myself. Or with just a little help. Here's the plan:

-Redo the chandelier (I can't wait to show you what I have up my sleeve!)
-Add crown molding (ok so Steve will be doing this one)
-Remove top part of white china cabinet and use it as a buffet instead
-Hang large mirror above buffet (again, that's a project you'll see later)
-Return huge antique dresser to my parents (it was perfect in our last home, but too big for here)
-Remove alll the junk of course (that's #1 on the list)
-Find a home for the bench in front of the window
-Add curtain and shades to the space
-Add wall art to the big blank wall where the dresser is now (again, another project you'll see)

All in all, it's not too bad! Down the line we also want to rip up the carpet and replace the flooring, as well as open up the wall into the entry way. But for now, just a few little things will make a HUGE difference!

The paint color is actually the ONLY color in the house I don't mind. It is a nice light gray. The color scheme for the room is going to be white/gray/black/silver. Very traditional yet with a modern, sophisticated twist.

You'll have to keep comin' back to see how things end up...

Have a great Easter weekend!

Wednesday, March 14, 2012

Master Bedroom Wall Happenings (Free Printables!)

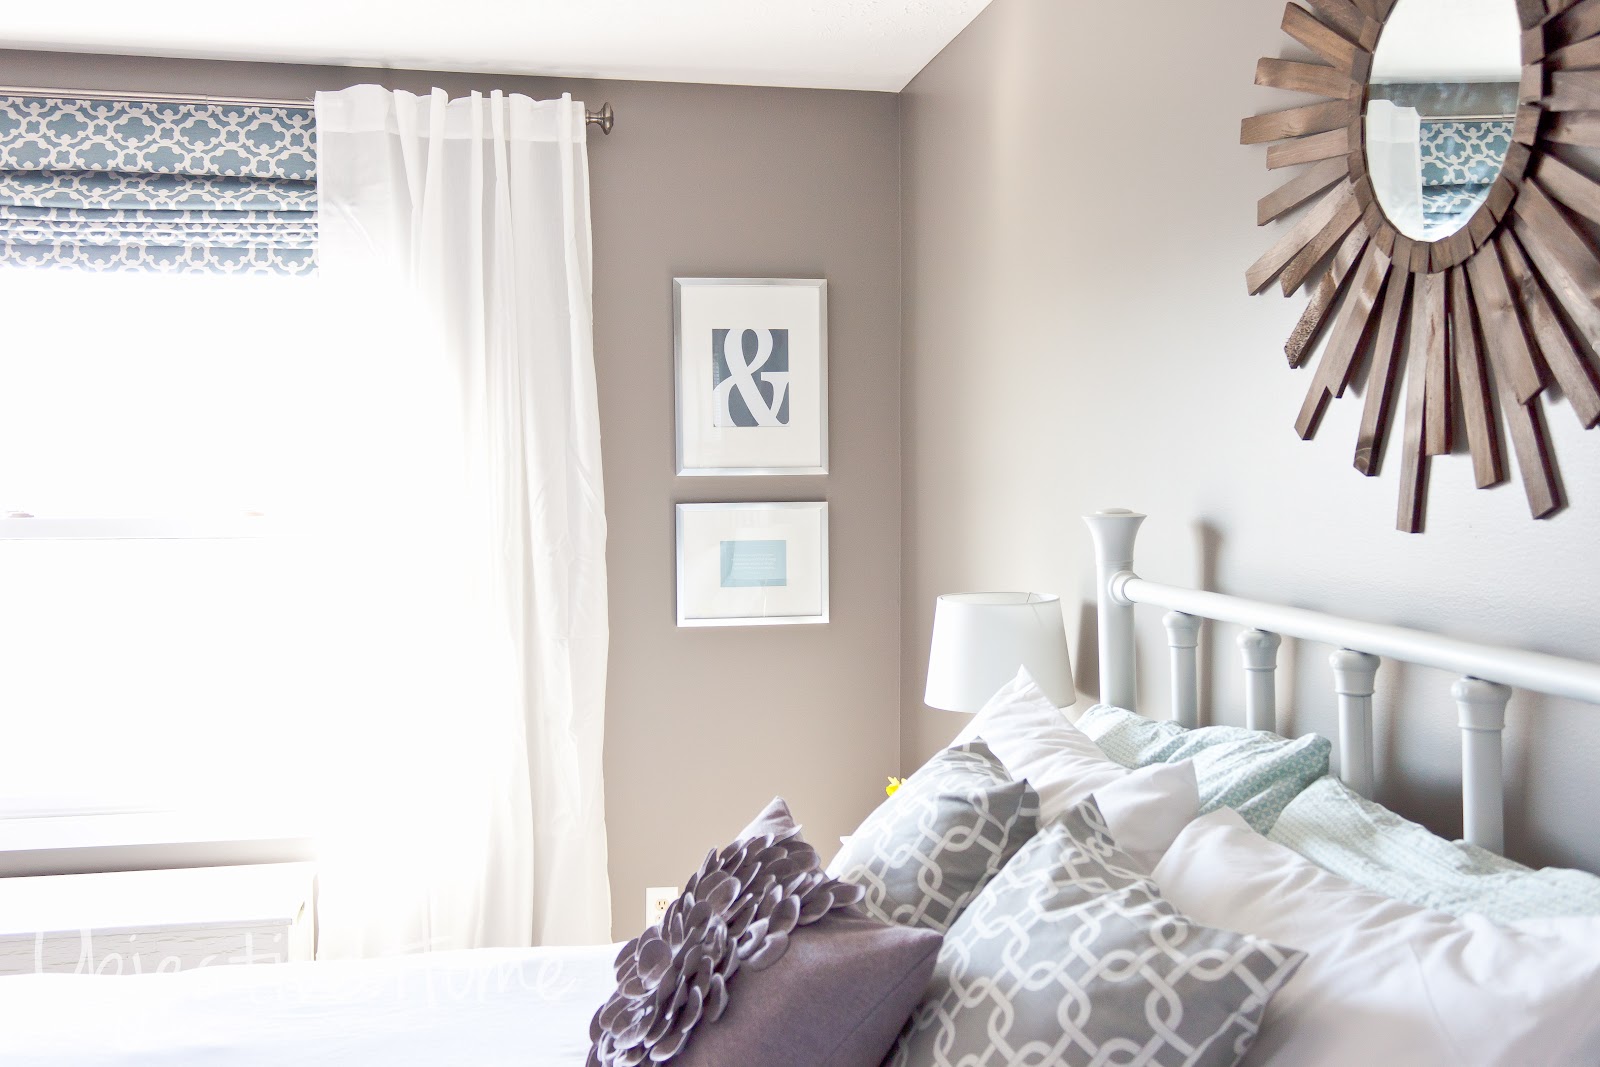
I took advantage of the nice weather yesterday and finally stained the sunburst mirror for our bedroom (tutorial HERE). I was SO nervous as I was staining it because holy smokes, it was dark. It stinks to spend so much time on something and then ruin it with the finishing. I just kept going and hoped it would be ok. I let it dry overnight and this morning it looked PERFECT! I think the dark stain is exactly what I was envisioning for the space. I wanted something dark to contrast all the white, and I think it will tie in with the dark brown leather chair (that I have yet to buy) in the corner and the leather ottoman under the smaller window. Adds a bit more masculinity to the room, which is nice. I want the space to look luxurious and relaxing, and give a nod to the man who also inhabits the space. Nothing TOO girly froo-froo.

I think I might need to move it a tad lower, now that I see the photos. I have a thing about wall decor hung too high on a wall. From what I've noticed, people tend to hang things much too high on their walls. It should be eye level in the center. Obviously, this piece is different, and it was super tricky getting it hung by myself.
 

I am really happy with how the stain allowed the dimension of the wood to show through. You can still see the variation in tones and such, which is what I was hoping for. I didn't want it to lose all definition once finished, which is why I went with stain instead of paint.

I also put together some "art" for the space next to the window. I found the brushed silver frames at Target for 50% off (with mats!) and I printed off the ampersand and the Dr. Suess quote with our printer. The ampersand is perfect for our bedroom, you know, Mr & Mrs, His & Hers, Heather & Steve. Cute stuff there people. For both pieces, it was under $15. Bargain. I chose gray for the ampersand and a gray-blue for the quote.


Printables are a GREAT way to put together very inexpensive "art" for your walls. All you need is a frame & a printer. If you don't have a printer, you could have it printed via one-hour photo at any photo lab for a buck or two. Still very cheap.

I found the Dr. Suess quote HERE and the ampersand HERE. They offer them in all different colors and there are LOTS more free printables on their site. There are so many free printables on the web, just do a search on Google or Pinterest and you'll find a bucket full. You just print them in whatever size you are looking for (I did 8x10 & 5x7), throw them in a frame and call it done! I also have made a bunch myself in Photoshop. Very easy, quick, and a bit more personal.

With the fan addition and the wall hangings, the room has more personality already. Still have to do the other roman, chair and find something for above the dresser. Among other little things. All in all, things are coming together nicely!

Pin It

Friday, March 9, 2012

Master Bedroom PROGRESS

Ahhhh....things are finally coming together on our bedroom! Steve did a great job painting and we are just about done except for one last coat of paint in the trim. I was SO apprehensive about choosing the wall color and I am absolutely 100% thrilled with the choice we made. If you remember, I was choosing between these two colors:
Galveston Gray by Benjamin Moore
Spalding Gray by Sherwin Williams

Wait a second. Let me back this train up a bit. Here are some shots of our room before. It was green and gold. Non-white trim. You haven't even seen the worst of it though. Before we moved in, the carpet was BLUE. We replaced that baby the weekend before we moved in!

This photo is almost useless, but you can get a taste of what the true before was. Shiny, striped drapes, veneered oak-ish doors, brass hardware. YUM.


Here is the space right before we started painting:

I think the before photos speak for themselves. No need to add anything more to these babies!

And here we are now, with a lot of progress & a handful of things left to do.

NOTE: I feel like these shots make the walls read a tad purple. Let me just say, there is ZERO purple tones in real life. It is pure gray with a slight slight brown undertone.
We ended up going with Galveston Gray by Ben Moore (even though almost everyone wanted the other one, I was just drawn to this one) and I LOVE it. It is a nice bright, rich gray during the day, and a dark, warm gray in the evening. An absolutely perfect gray. Couldn't recommend it more.

The sunburst I made will be going above the bed. I decided to stain it a rich, dark brown to pull in the leather ottoman & leather chair (that I have yet to purchase) and to bring a bit more contrast to the room.  I am waiting for another warm day to stain it before we hang it. I also want to do a pearl finish stencil on the bed wall, someday when I have a lot of time to kill!

That is the door to the walk in closet. As you can see, I have yet to make the second roman shade for this window. The treatments for it have had me thinking. I don't want two panels because the one on the left would have to be behind the night stand. So I think I will stick with just the one. Not 100% sure.

The vanity/console table was $10, from the Ronald McDonald House Sale. Ottoman under it was on clearance for $17 at Target. The antique tin ceiling panel mirror Steve made.

I haven't decided what I want to do on the wall above the dresser. I was thinking a few square frames in a row with black & white photos.


The chevron and gray chain link pillows I made (well, I made the covers). Tutorial coming soon for how I do mine. Quick and simple. Steve is not thrilled about how our pillows have multiplied. Why do men hate toss pillows so much?? He gets irritated about having to take them all off at night. Hahaa!


I am on the lookout for two larger lamps. Thinking a feminine crystal base. Heading to HomeGoods this weekend to take a look. So glad I finally found "night stands" tall enough for this bed! They are cabinets that I managed to get for $29.99 (YES you read that right!) each.

This pretty frilly pillow I found at Target on clearance for $10. I had been eyeing it for awhile. So glad I waited.

 
That alarm clock says in tiny print on the face, "WARNING! This alarm will wake you up!". No joke, that thing is LOUD.
Love those sheets! $30 on sale at Target (of course). White duvet was also on clearance for $12. Can't go wrong with those prices for such classic pieces.

There's me. In all my no-makeup, morning glory. I figure, this photo is far enough away that you can't really see anything too terrible. HA.
Leaning mirror, $40 with coupon from Kirklands.

 
Here's a shot with the romans down a bit. The grayish blue so nicely coordinates with the gray walls. I used the no-sew, made with mini-blinds, method. Steve hung the rod high up on the wall (gunmetal rod $25 & $20 at Target). Then we hung our favorite $15 Ikea panels wide on the window. He hung the romans directly behind the rod to give the illusion of a taller, wider window. The difference is huge!


I really like the gray rug. $20 at Ikea. Can't beat it! Love that I have an Ikea supplier....aka...my sweet mother in law who lives in Baltimore. Yay!


 Love the little reminder of Spring! Oh and the sweet itty bitty opalescent bud vase my mother gave me as a gift years ago.


The dresser was free, we painted it. The bed was $50 on Craiglist, painted it. Storage trunk under window, Steve built 6 years ago.

Before & After
 
I was going to go with more yellow in the room, but decided to keep it out for now. I like the serene, luxurious feel of the room just the way it is. As soon as you walk in, you feel less stressed and more calm. Exactly the feel we were going for! 

I am so happy with how the room has evolved. We have certainly gotten a lot completed, but here is some of what we have left to do:

-Find a nice sized, brown leather chair for the corner of the room
-Stain and hang the sunburst above the bed
-Taller, more feminine-yet-sophisticated lamps
-Roman shades for the other window
-Something for the wall above the dresser
-Second coat of trim paint
-Chandelier above the bed
-Something for the other side of the window (similar in scale to the brown sunburst mirror on the left)
-Stencil bed wall with a geometric print in a pearl finish

In total, we have spent under $500 putting this room together, that is including 5 gallons of primer & paint. What a steal. It is so relaxing and luxurious. A nice retreat for us at the end of a hard day. With some smart shopping & a bit of DIY, you can do it too!

You know, we could have spent a lot more money, and a lot less time, but the fun of it is hunting down the perfect pieces and making them your own. I get so much more enjoyment from the things that I either created myself (& with Steve) or altered somehow. I feel much less stress knowing that I bought everything in cash and didn't have to go into debt or spend all our savings on it. To me, that is the best part!

What is your favorite piece of the room? Any suggestions? Comments? Thoughts?
Pin It