Showing posts with label play room. Show all posts

Thursday, May 10, 2012

High & Wide Baby.

Today I wanted to talk about a tip that has helped me quite a bit as I decorate our new home. If you're anything like I was/am, you are challenged in the drapery department. My mother in law worked for JcPenney Custom Decorating for something like 20 years, and I am sure she was appauled at my choice in curtains in our last house. I really had no idea what to do with windows. I suppose I didn't do THAT bad, I went with all white sheers and white romans. No biggie. Except for one big thing. I hung them low and narrow. GASP. As in, basically just covering my windows. Yikes.

So then, as I navigated the decor world over the years, I noticed a big trend that I was NOT a part of. Hanging your window treatments HIGH up on your wall and WIDE on your windows. Why was it not obvious to me before?? What a ginormous impact this single tip has on a room.

Want to make your windows seem twice as large? Make your ceilings feel higher? Room feel more grand? Make a statement instead of just being "there"? Well then my friend, here is your solution. Easy as easy can be too.

Here is an illustration, just so you can get the idea. When I saw this earlier last week, I just knew I was going to have to share it. Because as much as I know the difference, it was crazy to see it drawn out so simply.

This is from Elements of Style.
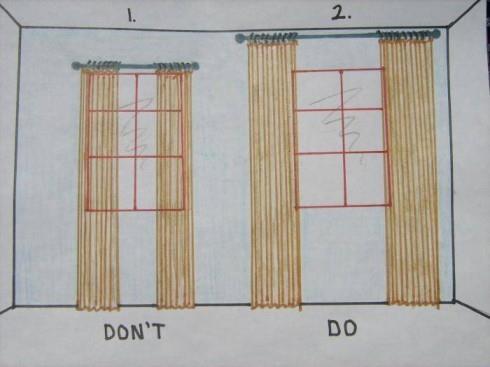
Now wontcha look at that! BAM. Can you believe that is even the same window???  Drastic improvement.

Along those lines, here are some of my tricks when dressing a window.

-Curtains should be either puddled on the ground a bit, or just touching the ground.

-Hang them within about 3-6 inches from the ceiling.

-That means, no more 84" inch panels. 95" all the way.

-Hang your rod wide enough so that the entire panel hangs just on the outside of the window frame. What I do, is have the panel approximately one inch over the window trim. So JUST covering the molding.

-You can either leave them as is, or if you want more privacy, hang roman shades. I hang  mine directly behind the curtain rod. Waaaaay up high on the wall. By doing this, you'll increase the height of the window and it will appear as though the window continues all the way up.

-With the romans, when they are open, open them so that they are JUST covering the top window molding.

-White panels ALWAYS work in a room. Always. If you have a dark space especially. I almost always go with white. I like to use white panels and patterned or bamboo romans (see HERE for my no-sew roman shade tutorial that has something over 18k Pinterest pins). White just brightens the space and again, makes the window seem much larger. Plus they are just so versatile and timeless. I like grommet top (if you plan on opening and closing them a lot especially) or back tab, which give you a nice pleated look. I steer away from tab top.

-If you want to add color or pattern and don't want to use a roman, you can use white panels and then cut one patterned panel down the middle and add them to the outside of the white panels. Giving you just a splash of color.

-For sliding glass doors, I do the same thing. Our deck slider has the rod hung right under the ceiling, with bamboo shades hung directly behind the rod. I used white grommet top panels so that they can be flung open and closed easily. The door looks WAAAAAAY bigger than when we moved in and vertical blinds were in place. YIKES. Stay away from verticals if you can at all help it. Talk about the '90s!

-For rods, I like large brushed nickel. As in, not the skinny skinny rods. I also like round finials. Classic, traditional, timeless. Honestly though, go with what suits your taste. Oil rubbed bronze and black are also nice.

Here are some examples of the window treatments hung in our house so far. We have only done the family room, master bedroom, kitchen, and partially the play room. I say partially because my plan is to make patterned fabric roller shades or romans. I just haven't gotten on that yet. I am working it around in my head, in terms of what color/pattern I want in there.

Playroom

This is the closest shot I have to a before. Before this though, the previous owner had frilly lace curtains hung directly over and on the window.

I would hang the curtains even wider than this if you can. I didn't because I was trying to use the rod I already had, which was stretched out as far as it would go. If I ever feel like it, I'll buy another rod and pull the panels out 6 more inches or so. Notice how I left the space between the rod and the window bare here. Works just fine. Shades to come eventually.


Master Bedroom

Again, closest I have to a before. This was the previous owners. Waaaaay too low. Too shiny. Mini blinds. Brass tiny rod.

Here is the other window.

After. BAM!!!! Can you even believe this is the same window???
Now I realize this is not the same window as the first photo. But, I haven't finished the other window and this one was dressed the exact same way as the other one was, before I took it all down for the photo above.
Notice the high bar, romans hung directly behind it and opened up right to the edge of the window. White panels hung completely on the outside of the window. This looks like a completely different window. Craziness.

Family Room

Before.
Previous Owners. So much wrong with this.

After
This was before we painted and moved the bookcase out of the room.

The room how it is now, from another angle. I don't know why I don't have a straight on shot. Whatev.

Here are some of my suggestions for inexpensive, versatile, white panels.

TARGET Grommet Top 95" FOR $35 (I have these in my family room and kitchen)

IKEA Back Tab 98.5" (comes with hem tape) for $10 a PAIR (these are the ones I have in my bedroom and playroom)

I think I've illustrated my point here. High and wide baby. Any other window treatment questions??

Thursday, March 22, 2012

Old Lady Junk Turned Narnia Portal


Steve thinks this mirror looks like a portal to another world. To Narnia. He thinks it is funky because the frame of this LARGE mirror is so thin. SO it looks like a portal. Well, better to be a Narnia portal than the gaudy old gold thing it was before!

This past October I was at the Ronald McDonald House Sale and from across the room I spotted this baby. The very moment I saw it, I said, "GAH! I must have that! In turquoise!". I scooted my little booty over to it and beamed at the $20 tag. NICE. It was crazy gold and very old lady-esque, but I saw past all that and only saw the fabulous curvy lines. Unique and purrrrrrdy! Have I mentioned how much I love the RMH Sale??? Why oh why is it only once a year??!! I have gotten the best finds from that place.

Well, it sat in storage (we were living with my father in law while we waited to close on the house) for awhile, and then sat in the dining room (currently our staging room for projects) for a couple of months. I needed some warm weather before I could work on it, and finally last week's weather fit the bill.

Here it is before:

Look at that finish. OK, so I realize some people may well really like this gold/bronze hideousness. You might be cursing my name for not sharing your fondness. Well, I'm sorry. It had to go.

First things first, I had to grab my arsenal. Spray primer in white, and glossy jade. I primed it first because a)I didn't want to have to prep the surface at all (sand, clean etc) because of all the curves, and b)Steve said the jade would cover better and more vividly over white. When it comes to paint, I listen to him. Usually.

The primer we had already, and the jade I picked up at ACMoore with a 50% off coupon for something like $3.

Step 1) Thoroughly cover the mirror. I used wax paper to shove underneath the frame (which took forever since there were so many curves) and a piece of plastic wrap once the wax paper ran out.


Step 2) Find your spraying location outside (I would never suggest spraying anything inside your house, fumes and over spray would be wicked) and cover your painting area. I sprayed in our garage because it was SUPER windy out that day. I used an old white fitted sheet. It doesn't have to be fancy schmancy stuff here peeps.

Step 3) Spray with primer. You want to hold the can about 8 inches away from the item. Also, good rule 'o thumb, "if your paints a sprayin', your arms a swayin'". Basically, when spray painting, never stop moving your arm. Never hold the can stationary in one position. Also, you want multiple, VERY thin coats. Thick coats of paint will a)take FOREVER to dry (multiple thin coats will dry much quicker than one thick coat) and b)drip drip drip all over the place. No one likes paint drips on their work.


At this point I was like, "Wow! This looks really good white. Maybe I should nix the turquoise and go with white instead!". But, I talked myself out of it because this is supposed to be a statement piece. So I begrudgingly pushed away my white addiction and trudged on.

Step 4) Spray with several thin coats of glossy jade. I think I did 4 coats or so. I sprayed it real thinly and then let it dry about 15 minutes before coming back and doing another quick spray. I had to really maneuver my way around this thing because of all the curves and hiding places where spray didn't want to go.

At THIS point I was thinking, "GAH!!!! I ruined it!!! I should have stopped at white!! What was I THINKING??!!!" LOL. I just kept going since there was no turning back now and figured I'd wait to judge it until after all the paper and such was removed. But I was already planning out how I was going to cover it in white.

Step 5) Let dry (I waited overnight) and then pull off all the paper. You might have to use a flat edge razor blade to scrape some paint off the mirror. I had a bunch of over spray, how that happened, I have no idea since every square inch was covered. Oh well. I got the mirror wet and then scraped (well, Steve did).

VOILA!

So I love it!! I think it was turquoise over-kill with all the paper and such. Once I peeled it all away, it was EXACTLY what I was hoping for. PHEW!! (I seem to say that phrase every single time I play with color)

It adds an unexpected swipe of color to the room and it definitely makes a statement. Everyone who has walked in the room since we put it up, raves about it!

I love how it reflects so much sunlight from the window, since they are directly across from each other.

It also perfectly matches the lamp on the other side of the room.

So there you have it. Bright & playful & something to talk about for sure. For $23 or so, it is definitely worth the price!

Wednesday, March 21, 2012

Adding A Bit More Playful To The Playroom

After we got a large chunk of the playroom done last month, and living with it for a few weeks, I decided it needed a bit more color. It was a whole heck of a lot of beige-white-neutral, and not enough BANG! THIS is a playroom! I think a playroom should be playful, for goodness sake. It should look very clearly like a room for kids. Colorful, bright, cheery, fun. At the same time, it IS still my home and I also need it to look presentable and not like a box of Crayola barfed all over the place. There is a fine line I think, and I wanted to figure out a way to liven it up yet stay away from that border.

Enter area rug. The room has wall-to-wall beige carpeting that was here when we moved in, and it left the main play space in the middle of the room looking so bare and plain and boring. I wasn't sure how it would go, throwing an area rug on top of plush carpet, but I took the plunge. It just really needed it! I am very pleasantly surprised at the results. It doesn't bunch much at all, nor does it move all over the place. I am planning on buying the carpet pad for underneath it to completely eliminate the wrinkling, but it is minimal enough that I haven't run out to do it yet. Take a peek.


It really defines and grounds the space! Instead of just a sea of beige, it brings a swash of sunny yellow in to center the room a bit. I am really liking it a lot. I purchased it from Home Decorators Collection online. It is 100% hand woven wool and it is flat woven and reversible. Yes! Reversible! So, not only will it last FOREVER being that it is wool, it will also hold up to kids because if it gets too gunky and drabby, I can flip that baby right over. SCORE.

Not only is it perfect for kids, but it was a great deal. I snagged this 5x8 beauty on sale (HERE) and with a coupon for $125, normally $200. PLUS I got free shipping. I was nervous buying it because it looks very bright and saturated online. I figured though, it was a great price and I could always return it if I didn't love it. Thankfully, it arrived and it was the perfect shade of mustard. PHEW!

As you can see, I also added that turquoise mirror above the play kitchen. I'll post more on that tomorrow actually. I have a bit more to do on that wall, but for now, it adds a Narnia-esque feel to the space. Which is very cool.

I also added a matching turquoise lamp and white garden stool in between the leather chairs. That space really needed a jolt of color because of all the neutral and white. It still needs a bit more, something. I am thinking about doing fabric roller shades (right now they are plain white cruddy plastic ones), but I have yet to find the exact fabric I am looking for.

Anyways, yes. I found that great lamp at Target on clearance (it was the last one!) and the drum stool/side table I picked up at Home Goods for $40. I LOVE it, but it makes the lamp a smidge too short for the chairs, so I might switch things up a bit.


I like how the turquoise pieces are opposite each other in the room. Coordinating, but not TOO matchy like if they were right next to each other.

I am happy with how things are coming together here. Very kid friendly, yet still grown up enough to be the first place people see when they walk in. I still have a couple little things I want to add to the wall with the mirror, to display the kids artwork and possibly a few books, but we'll see.

Among some of the other recent happenings, Steve switched out the ceiling fixture in the entry way for me. It was previously looking like this (this is before we moved in, clearly):

And here it is NOW:


It is a clean & simple, drum shade flush mount. Found HERE from Ikea. I love the texture, and at $29.99, you can't really go wrong. Steve was GENIUS and figured out a way to retro-fit it to the existing light fixture. So all we had to do was remove the glass on the old one and attach this one. No rewiring at all! Bonus.

So things are coming along well here. Adding bits and pieces all over the place. The nice weather the last week has had us focusing a bit on the exterior of the house, which has it's own to-do list. Tomorrow I'll be back to talk a bit more about the transformation of the mirror in the playroom. It went from hideous to cheerful for under $5!

Monday, March 5, 2012

Hi-Ho, Hi-Ho It's Off To Work We Go.

Lots of fun stuff in the works here this week! I think I'll start it off by rambling on a bit about the random things we have our hands on currently. We are ALLLL over the place for sure.

First on the docket. Master bedroom. Steve primed it last night and tonight the actual paint goes up. WOOOHOO! No more green and gold! The primer was tinted so I have a pretty good idea of how it is going to look and I am in love. Love love love. It is just the most perfect shade of gray that I was looking for in this space. PHEW! I was so nervous. I didn't even look while he was priming because I was so afraid I was going to hate it. I was already starting to feel bad that I was going to have to ask him to repaint it. When he told me I could go upstairs and look, I held my breath when I turned the corner and..... AHHHHHHHHHHHH LOVE! It is lovely. Now, it looks a little wack-a-doodle because the trim is still green and gold, but Tuesday night that will go too. Later this week you should get to see it in all it's pretty glory.

For now, here is what it looked like just before he started priming:


Alrighty. Next up. Entry way progress. Going well. What I am working on now is a bench for the space. I am turning our old Ikea end table (one of the few things left from when we first got married) into one. Today I am making the pad and tomorrow I will be painting it.  Right now I am scrounging around for something foam or foam-ish to use for it. Have you ever tried to buy a piece of foam from Joanns or Michaels? NOT cheap. They mark that junk up like 500x I think. I *know* I have SOMETHING I can use, somewhere. I am brainstorming. I found two kneeling garden pad thingys yesterday that I thought would make a nice firm pad, but they were a couple inches too short. Then I thought of using one of our wicker chair pads (and not worry about what I was going to do about replacing it), but that too was a couple of inches too short. Grrr. Now I am looking for foam packaging in the basement, and I stumbled upon my quilting batting. So I am going to try that and see if it is squishy enough.

Oh, so I took that Ikea table from in between the two leather chairs in the playroom and put the taller, smaller one from the entry and put it there. So I swapped the two tables. I am going to try to paint the one for the playroom this week. I am thinking white with some sort of fun yellow pattern on top. Stencil magic or something. Not sure. I picked up a really playful turquoise lamp to go there this weekend too. I was feeling the need to add a swash of color to that space, since it was so brown and beige and white. Just with the lamp it looks so much better!

Here is what it looked like before, and there is that little table, soon to be bench:

What else, what else.....ah yes. I decided I am going to stain the sunburst white. I want to keep the variation in shades but I don't want it plain because the wood tone doesn't match anything in our house. So I think white stain will give it a nice soft look with a bit of dimension still. I also feel like it will be easier than painting it too. I am fairly certain it will be going above our bed so we'll see how the cards fall. I might add some silver to it somehow as well.


My fabric arrived on Friday for our bedroom and hopefully at some point this week I'll find an hour to make a few pillow covers. I'm planning on doing a little quick tutorial on how I make them, so watch for that if you are in the market for that sort of thing.

Steve is so awesome and has been spending a lot of his evenings working on the doors for upstairs and I am happy to say they are DONE! All 13 doors have been replaced. Now we just have to paint them all, then we can reveal. I can't believe the massive difference they make. I'll talk a bit about the process of doing them, and the cost breakdown (which wasn't bad at all), later this week. That guy is so good to me (besides the fact that he tells me I'm pretty everyday). I love that we both really enjoy DIY stuff! It would stink if he wasn't on board with all my ideas and projects. It is such a fun hobby for us to do together.

So there it is. My plan for the week. Sound a little ambitious? Yeah...well, to be honest, it is mostly all small things. So long as everyone stays healthy, we should be able to manage. Check back in throughout the week to see JUST how much actually gets accomplished!

Monday, February 20, 2012

A place to PLAY!

Moving on to the next room of the house, is our play room. This room is in the front of the house, to your left when you first enter the front door. This room is the most closed off, and we hope to open it up a bit more soon. Remember the wall on the other side of the stairs I was talking about? Well removing that wall will open this space up to the entry. It will really make the first floor as a whole, much more cohesive in flow. Once you step into the dining area of the kitchen, the floor plan is very open. Flowing from dining area, to kitchen, to family room. The entry and two front rooms (this room and the formal dining room), are much more closed off. My last blog post kicked Steve into high gear and he is really motivated to get moving on starting that project! So that will be soon.

Back to the play room though. This room is of course, still in progress. We have most of it done though, after a week spent mostly putting it together. Just a few small things and I think we'll be good to go for a while. Which is great because the kids and I spend the majority of our day in this space. It is nice to have it brighter and more organized. It felt more like a shoe box previously. The walls were dark, the window and trim were dark, walls were blank...blah! Now it actually feels like a room. Imagine that!

Here are some before photos. Again, not great. This one is from the previous owners, before they painted it a hideous blue in between our two viewings. Don't you just love the organ?? Oh and of course the too-small "art". Yikes. 
Then, after our first tour of the place, they "upgraded" to this really terrible shade of blue. It was DARK and flat and really made you feel boxed into that room. This photo is really awful and zoomed in.
Here are a couple shots while we (Steve) were painting it. I told you Steve loves spackle, right? I wasn't kidding. These were taken at night on the iphone, so sorry about that.


 I can't tell you what a difference just painting the trim and window made! It really makes you appreciate white semi-gloss when you are painting over flat blue.

And here is our room now. The paint is a beige-gray. During the day it looks more beige, in the evening it looks more gray. I figured I'd stick with neutral walls in here because of all the colorful toys & accessories. It definitely has that playful look to it though, overall.
My white 96" drapes are from Ikea and we hung them nice and high and wide on the window. I also have white roller shades installed for privacy in the evening. The couch we had (and even though I don't love it, I can't justify buying a new one for a playroom that kids will PLAY in). The leather chairs are from Target. As is the ottoman and the lamp filled with lemons. The green, brown, and yellow/gray pillows are from Target and the other 3 I made. The table in between the chairs is from Ikea.

This is the wall that we want to open. Once we do that, we will obviously have to rearrange the room a bit. You can see the front door on the right, to give you an idea of the floor plan. The 3 shelving units (which we bolted together and to the wall) are from Target ($90 for all 3 pieces!). The chalkboard is the other one I made. That less-than-ideal torch lamp is from Target back when we first got married. I don't love it, but we need light on that side of the room and that is the only thing that fits. I'm on the look out for a better replacement. The letter 'E' my bestie Jane made for me as a housewarming gift.

This is what you see when you first walk into the house. On your left of course. You can see the sliver of gray-green entry on the left of the photo. The ladder we have had (it was left at our first house when we moved in. It is anchored to the wall).


The tripod lamp (which I LOVE) is from Target (are you noticing a theme here yet?). The canvas artwork I made. The play kitchen we made a few years ago and the kids table is from Ikea. The wall above the kitchen is empty for now but I have a big huge, awesome mirror to put there once I can spray paint it the fabulous turquoise color I bought for it. It will be super playful and also reflect sunlight from the window which will be directly across from it.
The side tables are a work in progress. I want to replace the feet with blocks (like the rest of the furniture) and also replace the pulls. They were originally part of a desk that was Steve's grandparents. Oh, I love that clear lamp! It is from Target and I haven't decided whether I like it empty or with the lemons. It is such a pretty tear drop glass base. 

The canvas "artwork", I made. Let me tell you. This was all so simple and quick. The one that took the longest was the flower. I made that with scrapbook paper and Mod-Podge. It took me FOREVER to figure out papers that looked good together and how to arrange them. I love the one little yellow petal, which is hard to see, but in the photo above you can see it a bit more clearly. The rest took about 30 minutes a piece, which I did over several days during nap.
The two black ones I painted with the chalkboard paint and then softened a bit by rubbing chalk all over them and wiping it mostly off. The striped one I made by painting over masking tape. The chevron print and the flower print, I used the entryway paint, to tie the spaces together a bit.
The chevron one, I printed and cut a stencil of sorts for. I used a mother of pearl acrylic craft paint for that, as well as for the birdie. It is nice because, depending on your angle, the paint looks white or silver. Very pretty. The birdie canvas, I painted yellow with acrylic craft paint and then white washed with some white paint mixed with a bit of water. Then I printed a birdie off of an image I liked, cut it out, and stenciled it. The quote I stenciled.
Overall, I love them! I had a 5 pack of canvases that were on sale for SEVEN dollars. Yes, you heard that right. Seven. So in total, including the 2 craft paints & foam brushes, all 5 pieces were under $10. They are each 16x20, so they cover a good amount of the wall when put together.
Here is the second chalkboard I made. It is a bit smudged up at the moment. Kid prints and such. I just quickly scribbled a cute Dr. Seuss quote that I really like on it with my chalkboard marker. I want to spend a little more time on it at some point. But for now, I like it.
"The more that you read, the more things you will know. The more you learn, the more places you'll go!"

So that's it so far. It has come a LONG way! Left on our to do list for this room:

-Open up the wall
-Spray paint the mirror I have for the empty wall above the kids kitchen space (waiting for some warmer weather)
-Revamp the side tables (the one on the right of the couch looks lower because I took the feet off already)
-Add bamboo shades to the window
-Shampoo the carpet. I have had the machine in my garage for weeks now. Must get on that! The carpet isn't terrible, but it will definitely look nicer once I get it freshened up.

Ahhh. So nice to have a space where the kids can play that is organized well for them and looks nice for me! They love having their toys on the shelving unit because they can see it all and it is easier to clean up. My favorite part of the room is my lighting. What do YOU like best? Any recommendations??
Take a moment to "Follow" me if you haven't already! Pin It